|
< back to part one
HOW IT ALL WORKS
Serious web designers upload pages and images onto their web space on the server,
not with the web browser, but using a system called FTP (File Transfer Protocol).
The FTP software logs into the server, gives the username and password and then
files can be copied over ('uploaded') from the web designer's PC to the server
PC.
The webcam also uses FTP. Each time it captures an image, it automatically
logs into the server and uploads the new image. Some webcam software assumes that
there is a constant connection to the Internet (eg. broadband). Other software can be set to dial
up, upload and disconnect for every image or to reconnect if a constant Internet
connection gets disconnected.
One of the reasons why webcams were slow to take off in the UK was because,
for a long time, most of us were charged by the minute, plus a minimum charge
of 5p each time we connected. That made running a webcam an expensive proposition.
But that all changed when finally we got flat-rate Internet services and eventually
broadband.
The web page
The other essential element for a still image webcam is the web page it appears
on. This includes some HTML code which makes the image update at regular intervals.
At its most basic, the web page includes just the code for the cam image file
(the image filename remains the same, even though it is being renewed every 30
seconds or whatever) plus a 'refresh' code in the HEAD part of the document. This
code tells the browser to reload the page every so often. Typically every 30 seconds
or one minute.
However, in practice, the page needs a few refinements.
Normally, web browsing software stores pages and images in its 'cache' and
displays these stored versions if the page is accessed again shortly afterwards.
In theory, the refresh code should force the browser to update the whole page
but, unfortunately, certain versions of certain web-browsers have problems doing
this. The code in the box below should help prevent most, if not all, of those
problems. Copy and paste it into the area between the <HEAD> and </HEAD>
codes of the webcam page.
Most sites provide this type of 'meta' cam page AND a Javascript page. Javascript
refreshes more reliably and can provide refinements such as a pop-up, resizeable
'remote' window and a countdown to the next refresh.
The scripts that I'm using at the moment are freely available from http://occonnect.com/johnqpublic
and, really, installing these is beyond the scope of a simple introduction such
as this.
LIGHTS, CAMERA, ACTION!
You may think that's all you need to think about. But oh no...
LIGHTING
Camcorders can produce a reasonable image in dim room lighting, but that doesn't
mean the situation is ideal. The picture will probably be a little grainy (grain
shows more on still captures than on moving video) and the light may come from
a less-than-perfect angle. There may also be far too much contrast between the
lightest and darkest parts of the scene, which gives a harsh effect on camera.
The answer is to increase the light levels slightly and change where the light
comes from. Doing that is easy... You can improve the situation enormously just
by using some ordinary domestic desk lights, table lamps or clip-on spotlights,
instead of relying on, say, a single central ceiling light.
By using extra lights you boost the level of illumination in the room a little,
reducing the grain. This also makes focusing more easy. You also reduce the contrast,
by lighting the room more evenly and throwing light into shadowy areas.
Plus you can create some neat effects and some 'mood' depending on exactly
where you position the lights. For example, you don't necessarily want someone
to be lit from the front. It can look good to have the main (brightest) light
to one side or even slightly behind them, with a weaker light in front.
You could highlight something in the background using a spotlight. This gives
the scene a feeling of depth. Or how about some coloured bulbs, which you can
get very cheaply at a local electrical store? Coloured lights are great for creating
mood and the colours look more vivid on camera than they do to the naked eye.
The brightness of any illumination depends on two things: the power of the
light and its distance from your subject. If you're using a directional light,
such as a spotlight, then one technique is to point it towards a white wall or
ceiling which is out of camera shot. This softens the light and 'bounces' it onto
your subject.
If you're pointing several lights directly at your subject, then it's good
to let one light source dominate. This is called the 'key'. Then use the other,
less-powerful lights to brighten up ('fill in') any shadow areas.
It's best to keep the actual light sources out of view of the camera, as they
will fool the camera into making the rest of the image too dark. If the light
source is close to a light-coloured wall and this 'hot' area is in shot, it will
have a similar darkening effect. This is assuming your camcorder doesn't let you
lock the exposure and, unfortunately most don't. But 'burnt out' areas around
lights look pretty unattractive anyway...
An anglepoise desk light is particularly good as you can experiment with it
at different heights and angles. Shine it directly onto objects (or yourself!)
to create dramatic shadows (low for a 'Phantom of the Opera' effect) or reflect
it off the wall to give soft, shadowless illumination. Shine the light through
a house plant to create shadow effects on the wall... Get the idea?
Recently I bought two floor-standing lamps from IKEA. These are about 4ft tall
with a 'gooseneck' section at the top. Which means the lamp can be twisted into
any position. This is terrific for webcam lighting and they are a bargain at £10
each!
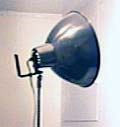 It's
also possible to pick up secondhand photographic lighting equipment quite cheaply.
Look out for light stands with 'bowl' reflectors (shown left). These are inexpensive
to run as they take standard screw-fitting domestic bulbs, which are available
in sizes up to 200w. However, I find that several 60 watt bulbs around the room
provide plenty of illumination with my camcorder. It's
also possible to pick up secondhand photographic lighting equipment quite cheaply.
Look out for light stands with 'bowl' reflectors (shown left). These are inexpensive
to run as they take standard screw-fitting domestic bulbs, which are available
in sizes up to 200w. However, I find that several 60 watt bulbs around the room
provide plenty of illumination with my camcorder.
MOVE THE CAM
Some people prefer to leave the camera in one place just to observe. Others
like to interact with it more. I do a mixture of both, depending on how busy I
am!
When you can, move the camera about for a close-up of you, or a wide shot of
the room. If you aren't going to be around, point it out of the window, at your
aquarium or pet cat! Have it at eye-level most of the time but, sometimes, put
it on the floor or on a high shelf looking down.
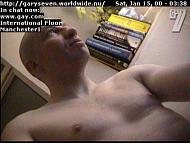
You can even hold the cam in your outstretched hand for a while, for some
funky angles like the two shown above. Most software gives a series of beeps as
its coming up to the next capture, so you only need to hold the cam steady in
position for a few seconds while you're snapped.
This works amazingly well. Your arm and shoulder won't be in shot, instead
it'll look as though you have some mystery camera operator filming you! Note how
the lighting on these shots gives them more atmosphere and impact. All done with
a single desk-lamp pointing away from me towards the wall.
Top tip: many camcorders have a range of shutter speeds, supposedly for sporting
events. No one can keep a camera entirely steady unaided, so set a slightly higher
speed when handholding. This prevents the captures from being blurred due to the
unavoidable movement of your hands. However, the higher the shutter speed, the
more light the camcorder will need. So it's a trade off between the two.
SUPPORTING THE CAM
Fill an old sock with lentils or rice and tie a knot in the end. This 'bean-bag'
(shown above) makes a great support for the camcorder. Put the bean-bag down,
plop the camcorder on top, and squish it around until it is at just the right
angle.
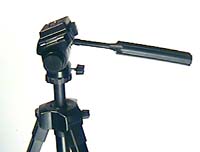
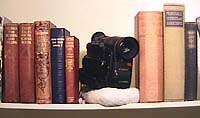
Buy yourself a tripod (above). Again, you can often pick one up cheaply secondhand
from a photographic shop or on Ebay. The camcorder screws onto the top of this three-legged
stand and can be locked in any position you desire.
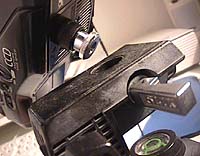
Look out for one that has a 'quick-release' platform (above). This lets you
attach and unattach the camera more speedily.
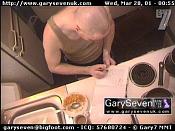
A monopod has only one leg and is good for propping up the camera in corners
when you are short of space. I used it in this shot (right) to get the camcorder
up near the ceiling for a view of the kitchen worktop.
OTHER ACCESSORIES & LUXURIES
CABLES & WIRELESS
Invest in some long cables and you'll be able to move the cam around more.
If you can use a soldering iron, you can easily make up your own inexpensive cables
for composite video.
A video sender is another alternative. I use one nearly all the time. The
camcorder plugs into a transmitter and a receiver connects to your PC. The image
is transmitted by wireless. Look -- no annoying cables! This gives you the freedom
to have the camera anywhere in the house or garden, or even next-door. A video
sender is available from stores such as Maplin Electronics for as little as £50.
A WIDER ANGLE
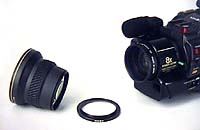
Most camcorders and PC cameras don't give a particularly wide view when compared
to some still cameras. However, you can get a wide-angle attachment (above) that
fits over the lens of a camcorder. This lets you include more of the room in shot
and, in my opinion, its one of the most useful accessories you can buy.
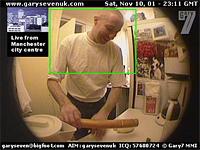
The zoom-lens still works with a wide-angle attachment but, in the image above,
which was taken in my tiny 7ft x 9ft kitchen, the lens has been zoomed out completely
to give an extreme 'fish-eye' effect. In fact, the camera was only about two feet
away from me and the green rectangle shows how little would have been in shot
from that camera position without the wide attachment.
LCD TV
A mini LCD TV is another good accessory if you're on cam away from the PC.
Connect the TV to the camcorder and you can preview what it's seeing without looking
through the viewfinder. Of course many modern camcorders have a screen built in.
USING YOUR CAM IMAGES
I guess it all depends on why people are running a webcam and a site, but I'm
surprised by the number of webcammers who don't keep any of their images and 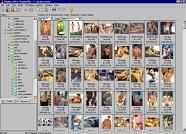 who
rely on visitors to send them back. Most software has the option to save a 'local'
copy of each capture on your PC and this is worth using even if you only turn
it on during your most interesting moments! who
rely on visitors to send them back. Most software has the option to save a 'local'
copy of each capture on your PC and this is worth using even if you only turn
it on during your most interesting moments!
My method is to put each day's captures into their own folder. I use Thumbsplus
(above) to manage all my images. Then, at the end of the month I write the whole
lot onto a CD.
Why bother? Well, just think of all the interesting features you can put together
for your site if you have those images. Use them to illustrate your Journal, make
a slide show or a gallery each month. Ninety-eight percent of them may be uninteresting.
But the other two percent are highly valuable 'content'!
STREAMING VIDEO
So what if you're not satisfied with broadcasting just a still image every
20 seconds or so and would like to 'stream' live moving video instead? There are
two ways to do this.
It's relatively easy to set up a live video cam on a web page. You can do it
with Windows Media Player and some free
streaming server software that you run on your PC. Then, when someone loads
the page and the player, it pulls the video from your PC. The problems come when
more than a couple of people want to watch your webcam at once, because each stream
takes some of the 'upload' part of your broadband connection.
Say you have the typical 2Mb down/256k up broadband connection and your webcam
stream is 50k. Only five people will be able to watch before the quality begins
to degrade for everyone.
Bear in mind that 50k is nothing when it comes to video. It's enough for a
small/poor quality picture. Consider that a YouTube video plays at ten of fifteen
times that rate (500k-750k). However, other than the data rate, it's important
not to confuse a live video stream with a prerecorded file such as those on YouTube.
They might seem similar but are really two very different things.
If you're serious about streaming live video to more than a couple of people
at once, you need to rent a special service from a web-hosting company. The bad
news is that it costs a LOT of money.
You stream your video to the hosting company's server, which then sends it
out to the people watching. As an example, one hosting company quotes $199 setup
fee and $799 each month to stream to 144 people for one hour each day.
DATA TRANSFER: IT SOON MOUNTS UP
Something else to watch out for is the amount of data that you transfer. Let's
suppose you run your static webcam 24 hours a day, 7 days a week. It uploads a
photograph to the server every 20 seconds and each image file is 33k in size (quite
small).
Every minute, your webcam transfers 100k of data. Every hour 6Mb (6000k). That's
144Mb of data a day. More than 4.5Gb transferred in a month.
Many of the cheaper broadband packages these days have a 'usage allowance'
of 1Gb, 3Gb or 10Gb and will charge you for going over your limit. So check this
out and do some maths.
MORE INFO
You can find more in-depth information on these sites: WebCamWorld
GayCams
So those are my top tips on web camming. If you have any other questions or
ideas that could be included here, drop me a line at the address on my contact
page.
Would you like to see more how-to-do-it articles about running a website,
photography and video? Let me know.
 |